Busy times
It has been a long time since I touched base with you. I get swept up in my enthusiasms and don't take the time to share what I am doing. Gosh, I don't even take the time to wash the kitchen floor! Many dolls have been made in the past few months. Here are some images of them:
This little rag doll is made with my own pattern, and is stuffed with wool.
These Santos Cage Dolls inspired me to learn a new skill, tinwork. There are some great videos on Youtube that show how it is done.
I wanted to make something soft and cuddly, so this little needlefelted guy was next. He has been patiently waiting for his clothes for ages now. Soon!
This little articulated doll was inspired by me seeing the work of momo&cose on Pinterest. She is made of papier mache and wire joints. Papier mache is not my favourite medium because it takes so long to dry between coats, and I get impatient, but it has the charm of excusing rough modelling.
As you can see, she is sitting on the bare bones of a 1:6 scale (approximately) Regency sofa. That was created because I had been impressed by some room box backgrounds I had seen for other dolls, and thought that my Regency Grodnertal-style dolls would look good with photo styling. That initiated a very deep and lengthy look into a) dollhouse construction b) 1:6 scale furniture construction c) roomboxes and their construction. I give thanks that the internet has so much material on all of these topics!
Firstly, I found an image of a Regency couch that I liked, found a couple of tutorials on how to make a miniature couch, scaled my plan and then began my new relationship with foam core, new exacto blades and hot glue. The leg installation isn't as secure as I would like, and I am now putting together another bigger sofa with a different leg support structure. Still, my first effort looks pretty good.
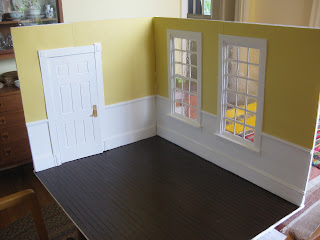
I undertook to make myself a convertible roombox with Regency decor on one side and modern loft on the reverse. Lots of calculations, designing and how-to videos later, I have something that has taught me a lot of new skills. Flooring, doormaking, moldings, windows. I still have to make window treatments for the Regency side, but youtube/the internet has come to my rescue with advice on how to get a drape in tiny curtains. I just put it together completely for the first time this morning and immediately all its flaws have made themselves evident. Still, it is my first effort. I can learn from my mistakes!
As if this wasn't enough, I was captivated by a picture of a Blythe doll wearing an adorable outfit, in an Instagram post by Melanie Wesley. I have resisted Blythe for years, but this image really got to me and I knew I had to possess this amazing cuteness! Many days and Youtube videos later, I was the owner of four Blythe dolls and all the tools needed to customize their little blank faces. I have finished my first faceup on a blank and now need to get up the courage to open up one of the dolls and begin tinkering with the eyes and hair.
Customizing the mouth. Beginning the carving.
I also had been looking at fashion doll repaints for a while and have many dolls in hand to get going. This head is from the first Barbie that I experimented on. Her hands had been chewed by a cat, so I didn't feel too badly about experimenting on her. This is where I am at so far.
So, you can see that I have been careening all over the dolly world since my last post. Lots still to do and to learn! Better photography is one thing, judging by my photos of the room box!


.JPG)


.JPG)
.JPG)
.JPG)
.JPG)
.JPG)
.JPG)
.JPG)


Comments
Post a Comment