Posts

Progress on my latest
Image
After a few setbacks, ahem, learning opportunities, my doll is now finished. The pose was a great challenge, but I learned a lot. I snapped the breastplate while trying to adjust the balance, so now I am even more experienced in how to do repairs!  The fabric was beautiful, and it inspired me to try making the most of the design possibilities of angling the stripes. I had made a circular skirt for another doll, so decided to make one for this one. There wasn't quite enough fabric to make the circle, so I pieced it at the back. Not too noticeable, I hope. The dramatic colour of the costume called for a dramatic hair colour, so I took out my stash of bamboo roving. Under a hat, it looks good. The hat was made for another project, but was too big. NEVER throw anything out, you don't know when it will come in handy!
Inspired by fabric

Image
The doll I am working on now has been inspired by a piece of red striped silk from a cool necktie. Its pattern called to mind my favourite doll created by Luella Mossom, a sad clown with dynamite jacket, vest and knickers, all in contrasting patterns. I also decided to take a leap into creating a challenging pose, one similar to The Little Dancer by Degas, where the weight rests on her back leg. There again, Luella was an inspiration. Several of her dolls are in that pose, and she has given me some good advice; to start with the feet to establish the balance and create the armature from there. I have decided to show as much of my process with this doll as I remembered to photograph, from the beginning. I have not been working as quickly as I would like, since I was also working on painting some small pictures of butter tarts for a Butter Tart Taste-Off to be held on September 23 at the market. I will be womanning a table of my still life pictures, which mostly fea...

Ready for her photo op

Image
I took a picture of my doll in the studio, but there wasn't enough light, so I decided to do an Etsy-ready photo shoot. Not my greatest work, but acceptable. I took a closeup of her sleeves, of which I am proud. I am delighted with the coif! On paper, the pattern for a coif looks like it will never work, but once you follow the instructions and prepare the hairstyle correctly, it really works! Many thanks to Extreme Costuming and Elizabethan Costume Page for all their explanations and images. I love those sites! I bought a beautiful silk necktie yesterday and it is inspiring me to get busy on a new doll. I can picture her  main points right now!

Bad hair day

Image
I knew I wanted this doll to be wearing an Elizabethan-type bodice, so back to The Tudor Tailor for a refresh on the pattern, then into my massive stash of fabric to settle on just the right one for the skirt and bodice. I had bought a linen-rayon blouse at a thrift store, and it looked the right weight and weave and colour to use for the skirt, so I cut into it and fiddled with the material for a long time, trying to arrange knife pleats, with little success. Decided to go back to cartridge pleating, since I have had good results with them and the look is in period.It made a skirt that looked the way I had envisioned, although it was a bit thick for the size of the doll. That is always a problem, getting the scale right. I have tried to make the waists of my dolls much smaller than I used to, because after all the layers the period costumes require, these little ladies have very thick waists. I guess I am still not thinking like a corset-wearing person. Making the bodice went well. C...

The learning curve

Image
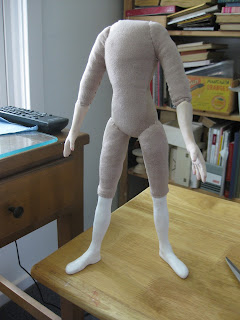
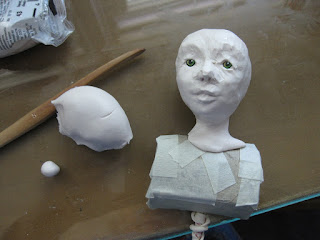
Work on my latest doll has been progressing steadily, but has not been without its challenges. I successfully attached arms and legs to the armature, and was happy with the results. The next step was to wind the stuffing/batting around the body and limbs, prior to sewing on the fabric that acts as skin. That went well. However, at one point I set the head onto the batting-covered armature, to test the balance and thickness, and the breastplate split! I had noticed that I had not made the foil of the head and shoulder breastplate armature smooth enough to prevent some parts of the clay from being thin in spots. It had not presented any problems in the past, but it certainly did this time. Since I had spent so much effort and time on this head, I was not ready to abandon it, so I grabbed more clay and my bottle of TLS, slathered it on as glue and pressed more clay into the breach, adding much more thickness to the inside of the breastplate. It baked successfully without affecting the pai...

The chair

Image
I have been busy doing summertime things, such as visiting family far away, and discovering the effort involved in cutting grass with a push mower (I don't do power tools, in general), which has slowed down my doll work. I worked on a new chair for my seated doll, which was fun to make, but time-consuming and tedious to wrap. I first used floral tape and that went well, since it sticks to itself and is not messy. I wanted the look of the chair I had seen on Pinterest, so I tried paper towel. It works very well in papier mache, as it is thick, but strong. On the other hand, my design necessitated fiddly work, wrapping tight spaces on curves. It took a few hours to do, but I am very happy with the result. Note to self- on any further chairs, make the design very plain and easy to wrap! I like her better on the new chair. The new doll head has been joined by arms and legs. Once again,  I have learned that it is important to leave long armature wires sticking out...

Still tinkering

Image
After much consideration, I decided my doll would be looking at a butterfly / fairy, so I made one. It was really bad. More consideration. Hedgehogs had been in something I read recently. I attempted to make a creature somewhat like one, and it turned out well. Fun to make, fun to paint. Now the doll is looking at her new pet. I still have to construct something that will keep the pet in her hands, but can allow it to be removed. I also decided I didn't like the scale of the chair. However, I saw something on a Pinterest board that looked just right, so I have spent time creating another chair in another style. I will show you when it's finished. For my next doll, a doll head, in a turning pose, appeared in my mind. I'd been thinking about making a doll with a likeness to an actress whom I think is very beautiful, Hattie Morahan, so armed with some images of her I started to sculpt. I have only done one other doll using an image of a person, La Casati, the red-haired ...